
Monday, July 8, 2013
Mouse acceleration on 10.6
To get back mouse acceleration feel like windows, install steermouse on 10.6.7 and set tracking speed 0.075, and sensitivity 125.
Tuesday, September 13, 2011
Driver for hackintosh
You will notice there or no sound and no wifi (for my laptop brand) after install SL (Snow Leopard). You will need to find suitable kext for it. Hackintosh community will create modded kext so SL can see your hardware and use it. You need to find it.
For Dell Inspiron 1427, I found out that my Dell Wireless Wlan 1397 minicard use Broadcom chipset, which is BCM4312. Thus, follow the chipset I google BCM43xx kext 10.6. I also google other phrase such as bcm4312 kext snow leopard. You will eventually get a lot of kext, try one by one. For Dell Inspiron 1427 use this. You need to able to see "Link up on en1" message at verbose boot mode for your wifi card to function. Most of the time the wifi card can't work. I try a lot of method, but all fail completely except the one above, which fail mostly, not completely.
 Now I use external USB wifi for my hackintosh wifi to work. I recommend Edimax Ew-7811Un, which I use it now. It support mac, which applies to hackintosh too. Downlaod mac driver from edimax homepage, works out of the box. It's so small that you can just plug in laptop and forgot it's there.
Graphic card should work the since the beginning, so you don't need to care about that, just delete NVEnabler.kext, and let GrahpicEnabler.kext do the job. You will get full screen resolution 1280x800.
Sound you need this. Follow instruction. After replace kext use kext utilites, and repair disc permission. After reboot you will have sound. For sound enhancement, find "Hear" software. You can either buy it or pirated it. I can't provide link here. The audio jack for external headphone / speakers works fine.
For Dell Inspiron 1427, I found out that my Dell Wireless Wlan 1397 minicard use Broadcom chipset, which is BCM4312. Thus, follow the chipset I google BCM43xx kext 10.6. I also google other phrase such as bcm4312 kext snow leopard. You will eventually get a lot of kext, try one by one. For Dell Inspiron 1427 use this. You need to able to see "Link up on en1" message at verbose boot mode for your wifi card to function. Most of the time the wifi card can't work. I try a lot of method, but all fail completely except the one above, which fail mostly, not completely.
 Now I use external USB wifi for my hackintosh wifi to work. I recommend Edimax Ew-7811Un, which I use it now. It support mac, which applies to hackintosh too. Downlaod mac driver from edimax homepage, works out of the box. It's so small that you can just plug in laptop and forgot it's there.
Graphic card should work the since the beginning, so you don't need to care about that, just delete NVEnabler.kext, and let GrahpicEnabler.kext do the job. You will get full screen resolution 1280x800.
Sound you need this. Follow instruction. After replace kext use kext utilites, and repair disc permission. After reboot you will have sound. For sound enhancement, find "Hear" software. You can either buy it or pirated it. I can't provide link here. The audio jack for external headphone / speakers works fine.
Bluetooth and optical drive works fine. No kext needed.
LAN should be able to work since the beginning. If not, use this. It's same as above, and it supports both LAN and wifi. LAN will work 100% after that and tested.
Touchpad I still not yet figure out the multi-gesture support, such as tapping and edge scrolling. Manual clicking and scrolling still work. For multi-gesture try VoodooPS2Controller.kext. I not yet try, and will not in the near future because I use external mouse mostly, and works fine. I use GMX-3 Powerlogic mouse, cheap gaming mouse, but works fine all buttions.
Sleep will cause hackintosh to hang, and need to force reboot. So don't sleep the hackintosh, set it at power option. If you close lid while in battery mode, it will auto sleep, so use InsomniaX to prevent your hackintosh to auto sleep.
Maybe due to distro usage, I only get 900-100 in Xbench. It's quite low, but still can live for normal usage.
Thats it, you have fully functional hackintosh snow leopard 10.6.7. You can install any software you want for your hackintosh. Enjoy.
Touchpad I still not yet figure out the multi-gesture support, such as tapping and edge scrolling. Manual clicking and scrolling still work. For multi-gesture try VoodooPS2Controller.kext. I not yet try, and will not in the near future because I use external mouse mostly, and works fine. I use GMX-3 Powerlogic mouse, cheap gaming mouse, but works fine all buttions.
Sleep will cause hackintosh to hang, and need to force reboot. So don't sleep the hackintosh, set it at power option. If you close lid while in battery mode, it will auto sleep, so use InsomniaX to prevent your hackintosh to auto sleep.
Maybe due to distro usage, I only get 900-100 in Xbench. It's quite low, but still can live for normal usage.
Thats it, you have fully functional hackintosh snow leopard 10.6.7. You can install any software you want for your hackintosh. Enjoy.
Update hackintosh from 10.6.2 to 10.6.7
Updating your snow leopard kernel is important. It's due to apple update is very fast. Many softwares minimum system requirement is now 10.6.4. If you not update you will not able to use the software. If you use same laptop as me, you will have no problem update, however you need follow step-by-step instruction.
It's important to delete NVEnabler.kext first. It will cause boot hang.
First, update from 10.6.2 to 10.6.4. Update can be obtain from apple website by just google it. Install 10.6.4 update. After install don't update yet. You will need to replace the SleepEnabler.kext. If not you will not able to boot. Download sleepenabler.kext by google "SleepEnabler 10.6.5". Replace SleepEnabler.kext at S/L/E. You need to use kext utilites after replace kext at E/E (Extra, Extensions) or S/L/E (System, Library, Extensions), because you need to repair permission for it. If you not using kext utilites, the new kext may not be able to used, and will cause kernel panic (BSOD) when boot. After that, go to repair disc permission at Application, Utilities, disk utilities. For every update you need to repair disc permission, if not you will get kernel panic. In fact, you need to repair disc permission often so your mac will function at top performance. Then restart.
You should be able to restart if you follow my procedure. Continue with above procedure for 10.6.5 update, except change sleepenabler.kext because the sleepenabler.kext above support 10.6.5. Use kext utilites and repair disc permission after update, then restart.
Note: Don't direct update from 10.6.2 to 10.6.7, or skipping any other update. I don't know why, but when I do that, I won't be able to boot.
Then, do the same for 10.6.6 update. Google "SleepEnabler 10.6.6" and replace it after update, use kext utilities then repair disc permission. Then restart. For 10.6.7 do the same. You should be able to boot successfully everytime, except the repair disc permission time will took longer.
I not yet update to 10.6.8 because I read that 10.6.8 change a lot and will most probably cause kp (Kernel Panic). 10.6.7 is already sufficient for most of the software system requirement, so I would not take the risk.
It's important to delete NVEnabler.kext first. It will cause boot hang.
First, update from 10.6.2 to 10.6.4. Update can be obtain from apple website by just google it. Install 10.6.4 update. After install don't update yet. You will need to replace the SleepEnabler.kext. If not you will not able to boot. Download sleepenabler.kext by google "SleepEnabler 10.6.5". Replace SleepEnabler.kext at S/L/E. You need to use kext utilites after replace kext at E/E (Extra, Extensions) or S/L/E (System, Library, Extensions), because you need to repair permission for it. If you not using kext utilites, the new kext may not be able to used, and will cause kernel panic (BSOD) when boot. After that, go to repair disc permission at Application, Utilities, disk utilities. For every update you need to repair disc permission, if not you will get kernel panic. In fact, you need to repair disc permission often so your mac will function at top performance. Then restart.
You should be able to restart if you follow my procedure. Continue with above procedure for 10.6.5 update, except change sleepenabler.kext because the sleepenabler.kext above support 10.6.5. Use kext utilites and repair disc permission after update, then restart.
Note: Don't direct update from 10.6.2 to 10.6.7, or skipping any other update. I don't know why, but when I do that, I won't be able to boot.
Then, do the same for 10.6.6 update. Google "SleepEnabler 10.6.6" and replace it after update, use kext utilities then repair disc permission. Then restart. For 10.6.7 do the same. You should be able to boot successfully everytime, except the repair disc permission time will took longer.
I not yet update to 10.6.8 because I read that 10.6.8 change a lot and will most probably cause kp (Kernel Panic). 10.6.7 is already sufficient for most of the software system requirement, so I would not take the risk.
Dual boot hackintosh on Dell Inspiron 1427
Note: Backup all your data first. I personally tested working fine, however, I will not responsible for any damage caused. LOL of course :p.
Note: You need understand hackintosh phrase first, eg kext, EFI etc... so you will be easier later. Useful website include tonymac, osx86 wiki, insanelymac. I not using tonymac method because it fail to boot for my laptop.
Hackintosh is installing a macintosh on a non-apple computer/laptop. For me, I installed hackintosh on my Dell Inspiron 1427. It's not an easy work, took me 5 days for it, with 2 days preparation, thus 1 week time. Most of the time is used for troubleshooting. If you have same laptop as me, or nearly the same brand with me, you can try my methods. However, wifi still most of the time can't work.
System spec: Dell motherboard, Nvidia Geforce 9300m gs, Broadcom 4312 wlan 1397 mini card. You may need another PC to google your problem when your PC is being installed with hackintosh.
I installed a non-vanilla hackintosh. Vanilla install is a direct macintosh installed on PC using real mac DVD from retail store. A non-vanilla hackintosh is also called distro, which there are experts install modification and hack into real mac DVD, so that it can be installed easier to most of Intel/AMD based laptop/PC.
For me, I use distro provided by Hazard, iPC OSX Snow Leopard 10.6.1-10.6.2 Intel.AMD SSE2.SSE3. I not yet try vanilla install because vanilla install require a lot of self work in terminal (DOS) and a lot of knowledge, which will took a lot of time. It's believed that vanilla install will be faster due to less unnecessary hacks in distro. Distro will include all hacks/mods to satisfy all type of laptop/PC, thus will have more 'rubbish' that slow down its performance.
If you want to dual boot with Windows 7, you may need to repartition your hardisk. Use Windows 7 build in "Disk Management" to create a free partition. Then, you will need Parted Magic (a linux bootable in RAM) to use gparted build in to format the partition you want install hackintosh to hfs+. If you not format the partition to hfs+/hfs, you won't be able to see harddisk during hackintosh installation. Get Parted Magic here.
After you have Parted Magic iso, you can either burn on CD or use USB to boot. I use USB. Create USB contain Parted Magic using UnetBootin. Google it.
Then, boot the USB contain Parted Magic. You need to set your BIOS to boot from USB. Google how if you don't know. Use default when a blue page with option come out, or just press enter (it will choose default). A linux will be booted which run on RAM. At desktop, select GParted. Then proceed with partitioning your harddisk. Beware you may lost data if you not careful. Backup first in case. GParted is easy to use. Partition your hackintosh partition to hfs+. Then reboot.
Now start with the installation part. I will shorten up with the successful path. First, disable USB BIOS support at your BIOS. If you don't know what is BIOS, google it. Tips: press F2 or F6 or F12 when your PC first start. Disable USB BIOS support will make your DVD bootable, if not you will stuck before enter installation page.
Second, boot the DVD. Press F8 when it asks for, with countdown 10s. Press -v (verbose mode, so you can see what it do, if no -v, you will only see apple logo with loading screen. It's useful to troubleshoot what make your installation hang), then enter. Optionally, you can just boot if your have same laptop as me, because it will boot without hang at halfway.
Third, you will see apple install screen. Go to Disk Utilities (search at menu bar at top). Partition your hackintosh harddisk to HFS+ (Journeled). I forgot the spelling already, because I am writting it out of my memory. Then keep 'next' until you see a customize button at bottom left. Select this option. Follow the guide completely, include delete NVEnabler after finish install. Then, next and your DVD will start running and installing.
After finish install, you will restart. If you dual boot, you most probably find boot:0 done, then will boot to windows. For this, it's due to you not set hackintosh partition to active. There's only one partition BIOS will see and boot from there. Your BIOS now see Windows 7 partition as active, so it will boot Windows MBR, and not find EFI of hackintosh. EFI is like BIOS of hackintosh. To solve this, you need to follow this method. After that, you will be able to boot into Chameleon (same as Windows MBR). At Chameleon page, you will be able to boot into Windows MBR, thus you no need to do anything further, such as fix Windows boot and MBR.
Boot to apple. You will get welcome page with a lot of welcome message . Continue step by step. At create user page, don't enter password and password hint. Insert later, because I get stuck there entering password and password hint. Then you will be able to boot into your hackintosh.
Now you had finish dual boot hackintosh and windows 7. I will proceed with other tweaking and enhancement on the next few chapters, if possible. Below is my final screenshot, at current date, on my Dell Inspiron 1427. I had moved my dock to right side, because dock at bottom consume more space, and make windows smaller.

Note: You need understand hackintosh phrase first, eg kext, EFI etc... so you will be easier later. Useful website include tonymac, osx86 wiki, insanelymac. I not using tonymac method because it fail to boot for my laptop.
Hackintosh is installing a macintosh on a non-apple computer/laptop. For me, I installed hackintosh on my Dell Inspiron 1427. It's not an easy work, took me 5 days for it, with 2 days preparation, thus 1 week time. Most of the time is used for troubleshooting. If you have same laptop as me, or nearly the same brand with me, you can try my methods. However, wifi still most of the time can't work.
System spec: Dell motherboard, Nvidia Geforce 9300m gs, Broadcom 4312 wlan 1397 mini card. You may need another PC to google your problem when your PC is being installed with hackintosh.
I installed a non-vanilla hackintosh. Vanilla install is a direct macintosh installed on PC using real mac DVD from retail store. A non-vanilla hackintosh is also called distro, which there are experts install modification and hack into real mac DVD, so that it can be installed easier to most of Intel/AMD based laptop/PC.
For me, I use distro provided by Hazard, iPC OSX Snow Leopard 10.6.1-10.6.2 Intel.AMD SSE2.SSE3. I not yet try vanilla install because vanilla install require a lot of self work in terminal (DOS) and a lot of knowledge, which will took a lot of time. It's believed that vanilla install will be faster due to less unnecessary hacks in distro. Distro will include all hacks/mods to satisfy all type of laptop/PC, thus will have more 'rubbish' that slow down its performance.
If you want to dual boot with Windows 7, you may need to repartition your hardisk. Use Windows 7 build in "Disk Management" to create a free partition. Then, you will need Parted Magic (a linux bootable in RAM) to use gparted build in to format the partition you want install hackintosh to hfs+. If you not format the partition to hfs+/hfs, you won't be able to see harddisk during hackintosh installation. Get Parted Magic here.
After you have Parted Magic iso, you can either burn on CD or use USB to boot. I use USB. Create USB contain Parted Magic using UnetBootin. Google it.
Then, boot the USB contain Parted Magic. You need to set your BIOS to boot from USB. Google how if you don't know. Use default when a blue page with option come out, or just press enter (it will choose default). A linux will be booted which run on RAM. At desktop, select GParted. Then proceed with partitioning your harddisk. Beware you may lost data if you not careful. Backup first in case. GParted is easy to use. Partition your hackintosh partition to hfs+. Then reboot.
Now start with the installation part. I will shorten up with the successful path. First, disable USB BIOS support at your BIOS. If you don't know what is BIOS, google it. Tips: press F2 or F6 or F12 when your PC first start. Disable USB BIOS support will make your DVD bootable, if not you will stuck before enter installation page.
Second, boot the DVD. Press F8 when it asks for, with countdown 10s. Press -v (verbose mode, so you can see what it do, if no -v, you will only see apple logo with loading screen. It's useful to troubleshoot what make your installation hang), then enter. Optionally, you can just boot if your have same laptop as me, because it will boot without hang at halfway.
Third, you will see apple install screen. Go to Disk Utilities (search at menu bar at top). Partition your hackintosh harddisk to HFS+ (Journeled). I forgot the spelling already, because I am writting it out of my memory. Then keep 'next' until you see a customize button at bottom left. Select this option. Follow the guide completely, include delete NVEnabler after finish install. Then, next and your DVD will start running and installing.
After finish install, you will restart. If you dual boot, you most probably find boot:0 done, then will boot to windows. For this, it's due to you not set hackintosh partition to active. There's only one partition BIOS will see and boot from there. Your BIOS now see Windows 7 partition as active, so it will boot Windows MBR, and not find EFI of hackintosh. EFI is like BIOS of hackintosh. To solve this, you need to follow this method. After that, you will be able to boot into Chameleon (same as Windows MBR). At Chameleon page, you will be able to boot into Windows MBR, thus you no need to do anything further, such as fix Windows boot and MBR.
Boot to apple. You will get welcome page with a lot of welcome message . Continue step by step. At create user page, don't enter password and password hint. Insert later, because I get stuck there entering password and password hint. Then you will be able to boot into your hackintosh.
Now you had finish dual boot hackintosh and windows 7. I will proceed with other tweaking and enhancement on the next few chapters, if possible. Below is my final screenshot, at current date, on my Dell Inspiron 1427. I had moved my dock to right side, because dock at bottom consume more space, and make windows smaller.

Sunday, April 24, 2011
Portal 2 on nvidia geforce 9300m gs
Not long ago I have played game Portal, which is game from Valve. It's a puzzle game, where you are a protagonist and given a portal gun, by which you can fire at a flat white plane, then fire another shot at another flat white plane, and you can go through as if both the plane is connected.
It's a fun puzzle game. If you scare spoiler, don't continue read this paragraph. It's more fun especially until the last level, you try to escape from evil robot that try to kill you, and you will eventually destroy the robot.
Portal 1 is 2006 game, so my Nvidia 9300m gs still very capable to handle it.
Luckily, Portal 2 haven't upgrade much graphic yet, and I still be able to play at around 25-30 fps depends on the condition (smoky, big area will drop fps more). It's definitely playable at lowest setting. If you use 9300m gs laptop, you will be able to play at all set to lowest. I have set that way, else the fps will be unplayable, or not enjoyable.
Well, I haven't finish play yet. I just download it today, and played 1 hour +. Not planning to finish it so fast, have to slowly enjoy it. It has about 6 hours gameplay if you a professional, so for me I think it would be around 8 hours gameplay.
It's a fun puzzle game. If you scare spoiler, don't continue read this paragraph. It's more fun especially until the last level, you try to escape from evil robot that try to kill you, and you will eventually destroy the robot.
Portal 1 is 2006 game, so my Nvidia 9300m gs still very capable to handle it.
Luckily, Portal 2 haven't upgrade much graphic yet, and I still be able to play at around 25-30 fps depends on the condition (smoky, big area will drop fps more). It's definitely playable at lowest setting. If you use 9300m gs laptop, you will be able to play at all set to lowest. I have set that way, else the fps will be unplayable, or not enjoyable.
Well, I haven't finish play yet. I just download it today, and played 1 hour +. Not planning to finish it so fast, have to slowly enjoy it. It has about 6 hours gameplay if you a professional, so for me I think it would be around 8 hours gameplay.
Sunday, April 10, 2011
WOT - a recommended addon for all your browsers.
 WOT, also called Web of Trust, is a firefox add-on the recommend to a site. I used it about a year already, and it never fail me at notifying me about the reputation of a website. It's a cumulative data that is voted by WOT users. After you install WOT, you can vote too.
As see at picture beside, google.com.my is a trusted website. It's voted green by users, and the human figures in 5/5. So you can definitely trust it.

I encountered some website that has 5/5 human figures, but the circle is red, just like picture beside. So, I kind of confuse at this part. So, I made my conclusion assume that human figures indicate how many persons has voted for it in a ratio (eg. 3 human figures means 3 millions voting), and the circle colour is average colour that people vote. This is my assumption only, don't believe it 100%, i will update when i got the answer. But, what you can 100% trust when you got green circle and 5/5 human figures.
You can download WOT here for firefox user. For non-firefox usage, you can download WOT at its homepage. It supports all popular browser.
Saturday, April 9, 2011
Friday, April 8, 2011
Understand your IP, and set statis IP address to ensure constant internet supply
How to know if you have statis or dynamic IP ? If you just type in password and connect to the internet, you will get dynamic IP.
Different between dynamic IP and statis IP is that, dynamic IP may changed after you restart your PC, while statis IP won't change. Dynamic IP is assigned to you by DHCP at modem, and usually your IP will be the same if no one else took your IP. When I stay at hostel, there's so many students sharing same internet, so bad that DHCP can't assign empty IP for me and other students. We have to type in static IP, and we need to try a lot of times for that. Why? Let me explain.
As an example, see picture embedded. I have set my IP to be static. My static IP is 192.168.1.103. The 103 is a unique number for me, so the person who share internet with me have to take other number. They will have to use 192.168.1.1, or 192.168.1.2 ... until limit at 192.168.1.254. This means that there's a maximum of 255 people can share the same modem, but there's very rare that this will happen for normal use.
IP address 192.168.1.x is given by ISP, and you need refer your modem for that. Different modem may have different numbers.
Below IP address is Subnet mask. It normally is 255.255.255.0, by which your PC will auto fill in for you.
Default gateway is the node to connect to the internet. It provides an entry point and an exit point in a network. It's provided by ISP, and it's "the number that connect to internet". When you type http:// , eg http://192.168.1.1 for me, I will be able to access modem and edit its settings.
DNS server is a server to help you find a website. For example you type www.google.com. Internet won't understand, because it's in abc. Also, google website is in numbers too. Try run "ping www.google.com" and you will get numbers instead of abc. DNS help to to access to google by changing www.google.com to 209.85.175.147 . You can always type 209.85.175.147 in address bar to access google, but you will have problem to remember those numbers. So DNS help you to access the page without the need for you to remember them.
My first choice DNS server is 192.168.1.1, which given by my ISP. It has lowest ping, thus will 'decrypt' faster for me, thus increase my browsing rate. My second choice is 8.8.8.8, which is a google DNS server. It's quite low ping for me too. You can run a test to determine best DNS for you here.
Different between dynamic IP and statis IP is that, dynamic IP may changed after you restart your PC, while statis IP won't change. Dynamic IP is assigned to you by DHCP at modem, and usually your IP will be the same if no one else took your IP. When I stay at hostel, there's so many students sharing same internet, so bad that DHCP can't assign empty IP for me and other students. We have to type in static IP, and we need to try a lot of times for that. Why? Let me explain.

As an example, see picture embedded. I have set my IP to be static. My static IP is 192.168.1.103. The 103 is a unique number for me, so the person who share internet with me have to take other number. They will have to use 192.168.1.1, or 192.168.1.2 ... until limit at 192.168.1.254. This means that there's a maximum of 255 people can share the same modem, but there's very rare that this will happen for normal use.
IP address 192.168.1.x is given by ISP, and you need refer your modem for that. Different modem may have different numbers.
Below IP address is Subnet mask. It normally is 255.255.255.0, by which your PC will auto fill in for you.
Default gateway is the node to connect to the internet. It provides an entry point and an exit point in a network. It's provided by ISP, and it's "the number that connect to internet". When you type http://
DNS server is a server to help you find a website. For example you type www.google.com. Internet won't understand, because it's in abc. Also, google website is in numbers too. Try run "ping www.google.com" and you will get numbers instead of abc. DNS help to to access to google by changing www.google.com to 209.85.175.147 . You can always type 209.85.175.147 in address bar to access google, but you will have problem to remember those numbers. So DNS help you to access the page without the need for you to remember them.
My first choice DNS server is 192.168.1.1, which given by my ISP. It has lowest ping, thus will 'decrypt' faster for me, thus increase my browsing rate. My second choice is 8.8.8.8, which is a google DNS server. It's quite low ping for me too. You can run a test to determine best DNS for you here.
Sunday, March 27, 2011
Remove Ads at MSN and YM easily.
Ever wonder how to remove those annoying ads at the bottom and footer of MSN and YM, where you accidentally clicked it, and it opens at browser? I have this problem until I saw the solution at
http://www.raymond.cc/blog/archives/2011/03/27/remove-ads-from-bottom-of-windows-live-messenger-2011-conversation-window/
The blog says that there's a patch for it to remove those ads, called A-Patch
http://apatch.org/. I used it and it works very well, moreover, A-Patch has more options to break the limit of editing MSN. Now we can say goodbye to Ads.
http://www.raymond.cc/blog/archives/2011/03/27/remove-ads-from-bottom-of-windows-live-messenger-2011-conversation-window/
The blog says that there's a patch for it to remove those ads, called A-Patch
http://apatch.org/. I used it and it works very well, moreover, A-Patch has more options to break the limit of editing MSN. Now we can say goodbye to Ads.
Friday, February 18, 2011
Install Microsoft Office 2007 at Ubuntu without hassle.
Microsoft Office can works on Ubuntu, with Wine (Windows 'Emulator' for Linux) which is still in beta. But, it is not stable enough.
If you are looking for stable version of emulator, I recommend CrossOver. CrossOver is a software for Linux and Mac, which allow several famous Windows, eg Office 03,07, to work flawlessly at Ubuntu platform.
CrossOver comes in simple GUI, and you can install CrossOver easily if you're already familiar with how to install software on Linux. You can always google steps if you encounter any problem, which has a lot of easily available solution.
CrossOver is a shareware, means you need pay for it. If you don't wish to buy, you can go to www.warez-bb.org and search for it.
To install Office 2007 at Ubuntu, you need Office 2007 installer and CrossOver. First, install CrossOver. Then browse for CrossOver program, and there has step-by-step instruction on how to install Office 2007. Optionally, you can search for CrossTie for Office 2007, which is a file to tell CrossOver how to install Office 2007 (.inf file for Microsoft Windows).
The screenshot should have a dock named docky below there, but I "Windows Dodge" mode it to make windows for viewing bigger. At Mac OS X, the bottom there just specialised for their dock function only.
If you are looking for stable version of emulator, I recommend CrossOver. CrossOver is a software for Linux and Mac, which allow several famous Windows, eg Office 03,07, to work flawlessly at Ubuntu platform.
CrossOver comes in simple GUI, and you can install CrossOver easily if you're already familiar with how to install software on Linux. You can always google steps if you encounter any problem, which has a lot of easily available solution.
CrossOver is a shareware, means you need pay for it. If you don't wish to buy, you can go to www.warez-bb.org and search for it.
To install Office 2007 at Ubuntu, you need Office 2007 installer and CrossOver. First, install CrossOver. Then browse for CrossOver program, and there has step-by-step instruction on how to install Office 2007. Optionally, you can search for CrossTie for Office 2007, which is a file to tell CrossOver how to install Office 2007 (.inf file for Microsoft Windows).
The screenshot should have a dock named docky below there, but I "Windows Dodge" mode it to make windows for viewing bigger. At Mac OS X, the bottom there just specialised for their dock function only.

Macbuntu - turns your ubuntu to very Mac OS X like
I have posted that I dual boot Windows 7 and Ubuntu at previous chapter. Not long ago, I stumble upon Macbuntu, which claims that it can make your Ubuntu looks like OS X. Due to a lot of positive reply, I decided to try.
http://sourceforge.net/projects/macbuntu/
Above is the link where I download macbuntu. The compressed file is in .tar.gz form. Extract it using embedded Linux decompressor to obtain a folder named Macbuntu-10.10. Inside got a file name install.sh. Open terminal (command prompt in Microsoft Windows). You can google for instruction on how to open the file in terminal, but I prefer simple way, that is drag the install.sh into terminal windows, then press enter.
You will be prompt to type your password to get root privilege, since Macbuntu reform your Ubuntu to very deep level. There'll be some question for you, and you should press y for yes and enter to continue with default selection. After that, it will auto restart.
You can see the screenshot at the homepage. It's easy to uninstall too, just drag uninstall.sh into terminal and you're back to Ubuntu original theme. It does what it claims and hopefully Kylebaker, who create Macbuntu even OS X alike than Mac4lin will continue his project.
http://sourceforge.net/projects/macbuntu/
Above is the link where I download macbuntu. The compressed file is in .tar.gz form. Extract it using embedded Linux decompressor to obtain a folder named Macbuntu-10.10. Inside got a file name install.sh. Open terminal (command prompt in Microsoft Windows). You can google for instruction on how to open the file in terminal, but I prefer simple way, that is drag the install.sh into terminal windows, then press enter.
You will be prompt to type your password to get root privilege, since Macbuntu reform your Ubuntu to very deep level. There'll be some question for you, and you should press y for yes and enter to continue with default selection. After that, it will auto restart.
You can see the screenshot at the homepage. It's easy to uninstall too, just drag uninstall.sh into terminal and you're back to Ubuntu original theme. It does what it claims and hopefully Kylebaker, who create Macbuntu even OS X alike than Mac4lin will continue his project.
Thursday, January 27, 2011
Took forever to load when open "Devices and Printers" at control panel
It happens to me last year, that is when I open Devices and Printers in control panel, it hangs there loading , and keep loading ... It just won't end. Luckily, I google around and found the solution.
The problem arise when you have bluetooth port opened, but the support service is not started. It causing system can't open properly.
 Well, you can solve that by run "services.msc", then search for "Bluetooth Support Service". The status should be empty, and Bluetooth Service above it is started. Double click on Bluetooth Support Service, change the Startup type to Automatic, then start the service. This means that this service will start everytime you turn on your computer. After that, apply and Ok.
Now, go to open "Devices and Printers". You should can now open it without problem.
The problem arise when you have bluetooth port opened, but the support service is not started. It causing system can't open properly.
 Well, you can solve that by run "services.msc", then search for "Bluetooth Support Service". The status should be empty, and Bluetooth Service above it is started. Double click on Bluetooth Support Service, change the Startup type to Automatic, then start the service. This means that this service will start everytime you turn on your computer. After that, apply and Ok.
Now, go to open "Devices and Printers". You should can now open it without problem.
"Program not found - skipping autocheck" during boot
Have you ever annoyed by the nagging page during booting up your program, eg. Autochk.exe not found- Skipping autocheck. Well, I am kinda annoyed by those and I got a solution on how to remove those.
First, run "regedit" which stands for register editor. Press ctrl+F, or optionally go Edit at menu bar, then select find.
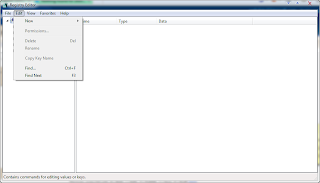 Then, search the name of the program that nagging you during start up. For example, Autochk.exe is the one not found, so find it at register. You may searched several autochk, but don't simply delete, because it may cause system instability.
You will found autochk, that have description that saying 'boot' sort of that, not remember really since it's quite some time this happen to me. The description will like saying this will boot during start up. Delete this registry. After that, restart, and the nagging page will gone.
If you scare it will mess up your system, since editing in registry can cause severe system damage, you can backup your register first. Right click at folder beside there that link to the autochk.exe, then export, save at your desired location. You can always import back the register by double click the saved registry in case your system have problem.
First, run "regedit" which stands for register editor. Press ctrl+F, or optionally go Edit at menu bar, then select find.
 Then, search the name of the program that nagging you during start up. For example, Autochk.exe is the one not found, so find it at register. You may searched several autochk, but don't simply delete, because it may cause system instability.
You will found autochk, that have description that saying 'boot' sort of that, not remember really since it's quite some time this happen to me. The description will like saying this will boot during start up. Delete this registry. After that, restart, and the nagging page will gone.
If you scare it will mess up your system, since editing in registry can cause severe system damage, you can backup your register first. Right click at folder beside there that link to the autochk.exe, then export, save at your desired location. You can always import back the register by double click the saved registry in case your system have problem.

Tuesday, September 7, 2010
Play snakes at Youtube
If you boring wait slow youtube load, play snakes at there first. Belows are the steps:
1. Open a youtube video in your browser.
2. Press pause.
3. Press the left button and hold it for a few seconds.
4. When you see snakes at youtube, release the left button and enjoy playing snakes.
1. Open a youtube video in your browser.
2. Press pause.
3. Press the left button and hold it for a few seconds.
4. When you see snakes at youtube, release the left button and enjoy playing snakes.
Tuesday, August 31, 2010
Bypass torrent throttled by Streamyx
I recently use Thunder to download things from demonoid and hanju100. The speed is quite decent if there's lots of seeds. Thunder can bypasss torrent download limit set by Streamyx. Normally if use utorrent should get download speed less than 20kbps, with Thunder, I can download at my normal download speed. Below is my proof:

I use hehethunder, which is modded thunder downloader. Some can change its interface to english, I try it but the word come out weird, so I use back chinese word.

I use hehethunder, which is modded thunder downloader. Some can change its interface to english, I try it but the word come out weird, so I use back chinese word.
Sunday, August 29, 2010
Symantec Endpoint Protection, activated forever.
For anyone that want a good antivirus, with less configuration, and don't want wasting time finding license, Symantec Endpoint Protection is your solution.
For your information, Symantec is same root as Norton, just Symantec is aiming for server and client usage in company, while Norton is mostly target home users. Of course, it's possible to use vice versa.
Symantec Endpoint Protection is Windows 7 compatible, for both 32 and 64 bit. It offers good protection for your PC. One major drawback is it slows down your startup. After startup, it won't slow down anymore. Another minor drawback is while you are playing with its GUI, it kinda slow at your respond. For example, when you click Options, it came out after a few seconds.
It can be downloaded at
For 32 bit
http://rapidshare.com/files/263745200/Symantec_Endpoint_Protection12.0.122.192_EN.32bit.exe
For 64 bit
http://rapidshare.com/files/263768681/SEPC-12.0.122.192_EN_x64_eeepc.exe
If you not sure, then choose 32 bit. It's preactivated, that means you no need to activate it, just install, update it, and you are done. It's highly recommended to restart after install, although it does not prompt you to restart after install.
If links dead, visit
http://www.warez-bb.org/viewtopic.php?t=3105816&highlight=

For your information, Symantec is same root as Norton, just Symantec is aiming for server and client usage in company, while Norton is mostly target home users. Of course, it's possible to use vice versa.
Symantec Endpoint Protection is Windows 7 compatible, for both 32 and 64 bit. It offers good protection for your PC. One major drawback is it slows down your startup. After startup, it won't slow down anymore. Another minor drawback is while you are playing with its GUI, it kinda slow at your respond. For example, when you click Options, it came out after a few seconds.
It can be downloaded at
For 32 bit
http://rapidshare.com/files/263745200/Symantec_Endpoint_Protection12.0.122.192_EN.32bit.exe
For 64 bit
http://rapidshare.com/files/263768681/SEPC-12.0.122.192_EN_x64_eeepc.exe
If you not sure, then choose 32 bit. It's preactivated, that means you no need to activate it, just install, update it, and you are done. It's highly recommended to restart after install, although it does not prompt you to restart after install.
If links dead, visit
http://www.warez-bb.org/viewtopic.php?t=3105816&highlight=
Monday, June 7, 2010
Streamyx allow emule again?
My friend asks me to download using emule. Emule is basically P2P, and streamyx capped all P2P at low download speed. To my surprise, it download at full speed if there's lots of seeds.

As you can see, the download speed is over 140kbps (which is quite low when i capture this image) when the seeds connected is 39. It's just like download from rapidshare etc... file host.

As you can see, the download speed is over 140kbps (which is quite low when i capture this image) when the seeds connected is 39. It's just like download from rapidshare etc... file host.
Wednesday, February 17, 2010
Print powerpoint slideshow 6 slides in a page effectifvely
I do some research, and ask friend, finally know how to print bigger powerpoint slideshow in a page without wasting space at the gap between slides.
First, install fineprint.
http://rapidshare.com/files/316011388/FinePrint.v6.12.rar
http://hotfile.com/dl/19468247/fdb631f/FinePrint.v6.12.rar.html
Then, import registry and replace the file into installation dir. Normally you need to search "fineprint" because the installation dir is in spool folder in system32 of windows. Set your default printer to fineprint if asked.
Then, print like normal but choose fineprint as printer. After that, you will see this
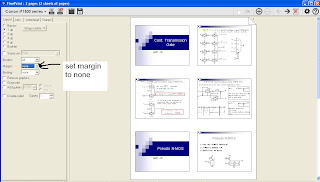
Do notice that the gap between slides is small, and the printing size for a slide is more big, so you can view words/pics in slide more clear.
First, install fineprint.
http://rapidshare.com/files/316011388/FinePrint.v6.12.rar
http://hotfile.com/dl/19468247/fdb631f/FinePrint.v6.12.rar.html
Then, import registry and replace the file into installation dir. Normally you need to search "fineprint" because the installation dir is in spool folder in system32 of windows. Set your default printer to fineprint if asked.
Then, print like normal but choose fineprint as printer. After that, you will see this

Do notice that the gap between slides is small, and the printing size for a slide is more big, so you can view words/pics in slide more clear.
Monday, February 1, 2010
Dual boot windows, and install AHCI driver on Windows XP
Recently I install VMWare, which can create virtual operating system on an existing operating system. For example, I can use Windows XP in Windows 7, but XP is windowed. WMWare will create virtual driver for XP so I no need find driver for it, but the grahpic card is not support, and the processor is weighted by 2 operating system making XP in Windows 7 perform quite slow. It uses up a lot of RAM too, and my 4GB RAM almost reached top when I open 2 Operating system in WMWare.
So, I decided to Dual-boot XP and Windows 7. Below is the useful tutorial. Follow all steps, and don't take alternative. I take alternative by install EasyBCD, and VistaBootloader, and can't work, until I use back this tutorial.
Windows Tutorials - Dual Boot Vista And XP (Vista Already Installed) | DreamInCode.net
Windows 7 that I install only support AHCI SATA mode, but Windows XP just support ATA SATA mode. It's quite annoying for me if I want to change setting at BIOS in order to change operating system. So, I decided to install AHCI for XP, so I can dual boot them. Below is the tutorial.
http://forum.msi.com.tw/index.php?topic=106575.0
Don't forget to turn to page 4. I fail to work this out until I see tutorial in page 4.
So, I decided to Dual-boot XP and Windows 7. Below is the useful tutorial. Follow all steps, and don't take alternative. I take alternative by install EasyBCD, and VistaBootloader, and can't work, until I use back this tutorial.
Windows Tutorials - Dual Boot Vista And XP (Vista Already Installed) | DreamInCode.net
Windows 7 that I install only support AHCI SATA mode, but Windows XP just support ATA SATA mode. It's quite annoying for me if I want to change setting at BIOS in order to change operating system. So, I decided to install AHCI for XP, so I can dual boot them. Below is the tutorial.
http://forum.msi.com.tw/index.php?topic=106575.0
Don't forget to turn to page 4. I fail to work this out until I see tutorial in page 4.
Wednesday, December 23, 2009
VMLite - Alternative for Windows 7 XP Mode.
I downloaded VMLite, which is only 54MB in size. It has build in feature to download Windows XP disc (about 500MB) from internet. I install it in my Windows 7 64 bit.
To my surprise, it does not need any driver to run, only bad things is it does not detect my NVIDIA card, so it is a bit laggy when you move around windows. It use VMLite build in feature to support the display driver, which is terrible enough, like you haven't install any video card. I try install Nvidia XP driver, but it reject it, maybe the card is used by Windows 7, not sure though.
VMLite main function is to run program that not compatible with Windows 7, and decent game is not supported as no graphic card detected in VMLite. I think I won't need to use VMLite, for now, as Windows 7 currently support lots of program. Only very old program that Windows NT / 2000 based that can't be supported by Windows 7.

To my surprise, it does not need any driver to run, only bad things is it does not detect my NVIDIA card, so it is a bit laggy when you move around windows. It use VMLite build in feature to support the display driver, which is terrible enough, like you haven't install any video card. I try install Nvidia XP driver, but it reject it, maybe the card is used by Windows 7, not sure though.
VMLite main function is to run program that not compatible with Windows 7, and decent game is not supported as no graphic card detected in VMLite. I think I won't need to use VMLite, for now, as Windows 7 currently support lots of program. Only very old program that Windows NT / 2000 based that can't be supported by Windows 7.


Subscribe to:
Posts (Atom)
